It’s that time of year again – the leaves are changing color, the days are getting shorter, and winter is just around the corner. For RV owners, this means it’s time to start thinking about winterizing their vehicles. If you’re not sure how to go about it, don’t worry – we’ve got you covered. In this article, we’ll discuss the most important steps for winterizing your RV. We’ll also provide some tips on how to make the process easier and less time-consuming. So read on to learn more!
Table of Contents
Why do you need to winterize your RV?
Just like your house, your RV needs to be properly maintained and winterized in order to withstand the cold weather. Winterizing an RV is fairly simple and only takes a few hours, but it’s important to do it right in order to avoid any expensive repairs down the road.
If you live in an area with freezing temperatures, then you need to winterize your RV to prevent your pipes from freezing and bursting. By winterizing your RV, you will also be able to keep your water heater and other appliances running properly.
Here are a few tips on how to winterize an RV:
- Drain the fresh water tank and add antifreeze. Be sure to run the pump until antifreeze comes out of all the faucets.
- Drain the gray and black water tanks completely. You can use a flush wand or a small hose to do this. Be sure to disconnect the sewer hose from the RV before draining the tanks.
- Remove all food from the fridge and freezer. Clean the fridge and freezer thoroughly before putting any food back in.
- Turn off the propane tank and disconnect all hoses and appliances that use propane.
- Disconnect the battery and store it in a warm, dry place.
- Cover any exposed pipes with pipe insulation or heat tape.
- If possible, store your RV in a heated garage or storage unit to keep it from freezing. [1]
When should you winterize your rig?
Most people winterize their RVs when temperatures start to drop and they won’t be using their RV for a while. This could be anywhere from late fall to early winter. If you know a big freeze is coming, it’s always better to err on the side of caution and go ahead and winterize.
There are a few things you need to do before you can winterize your RV. First, you need to make sure all the water is out of the lines. This includes draining the fresh water tank, gray water tank, and black water tank. You also need to empty any holding tanks that might have water in them – this includes the toilet, shower, and sink. Once all the tanks are empty, you’ll need to add RV antifreeze to all the drains and holding tanks.
After you’ve added RV antifreeze, you’ll need to run water through all the lines to make sure they’re fully coated. This includes turning on all the faucets and letting them run until you see pink antifreeze coming out. Once that’s done, you can close all the valves and disconnect the water supply.
The next step is to winterize your RV’s plumbing system by adding RV antifreeze to the fresh water tank. You’ll need to do this even if your fresh water tank is empty – it’s just a good precautionary measure. To do this, you’ll need to connect a hose from the RV antifreeze container to the inlet side of your water pump.
After the plumbing is taken care of, you’ll need to winterize your RV’s engine.
Once that’s done, you can disconnect the battery so your RV is completely ready for winter storage. [2]
If you follow these steps, you’ll be well on your way to making sure your RV is ready for winter. So get out there and enjoy the season – and don’t forget to winterize your RV!
When temperatures go below freezing
Assuming you don’t have access to full hookups, you’ll need to properly winterize your RV so that your pipes don’t freeze and burst. This process is actually pretty simple, but it’s important to do it correctly in order to avoid any costly damage.
The first step is to make sure that all of your tanks are emptied. This includes both the fresh water tank and the gray/black water tanks. Once they’re empty, you’ll want to add some non-toxic antifreeze solution into each one. For the fresh water tank, you’ll need to add about a gallon of antifreeze for every fifteen gallons that it can hold. As for the gray/black water tanks, you’ll need to add at least a cup of antifreeze.
Once your tanks are taken care of, the next step is to winterize your plumbing. This involves adding RV-specific antifreeze to all of your faucets and drains. You’ll want to start by running some water through each faucet until it becomes pink in color. Then, turn off the valves that lead to the outside (the ones under your sink should be labeled). Next, open up all of your faucets and drains and let them gravity-drain. Finally, add antifreeze to each drain until you can no longer see any water coming out.

The last step is to winterize your RV’s engine. This is actually a pretty simple process, but it’s important to do it correctly in order to avoid any damage. First, you’ll need to change the oil and filter. Next, you’ll want to add some fuel stabilizer to your tank and run the engine for a few minutes so that it can reach all of the parts that need lubrication. After that, simply disconnect the battery and store it in a warm place (like your house).
When storing your RV
The first step is to clean out your RV. This includes taking out all food and perishable items, as well as any trash. Next, you’ll want to give your RV a good thorough cleaning, inside and out. Once that’s done, you can start the process of actually winterizing your RV.
One of the most important aspects of winterizing an RV is making sure the plumbing system is protected from freezing temperatures. This means draining all the water from the system, including the fresh water tank, gray and black water tanks, and all the lines leading to and from them. Once that’s done, you’ll need to add RV antifreeze to the system to make sure it doesn’t freeze during storage.
Another important aspect of winterizing your RV is making sure the battery is properly charged and storing it in a cool, dry place. If possible, disconnect the battery from the RV altogether to prevent any potential damage from freezing temperatures.
Once you’ve taken care of all the major systems in your RV, you can start thinking about some of the smaller details. This includes things like removing any valuables or personal items that you don’t want to leave in an unoccupied RV, as well as covering any exposed areas to protect them from the elements.
When traveling through cold climates
When traveling through cold climates in your RV, you want to make sure that your vehicle is properly winterized. This process involves a few key steps:
- Drain all the water from your RV’s plumbing system.
- Add antifreeze to all the drains and toilets.
- Remove any perishable food items from the fridge and cupboards.
- Disconnect the battery and bring it inside.
- Cover the RV’s windows and doors with insulating material.
By following these simple steps, you can ensure that your RV will be ready to withstand even the harshest winter conditions!
Tools Needed Before You Begin
- Water heater bypass kit
- RV antifreeze
- Garden hose and fresh water hose
- Screwdriver
- Pliers
- Funnel
Now that you have your tools, it’s time to get started! The entire process should take about an hour or two, depending on the size of your RV. If you have never winterized an RV before, don’t worry! We will walk you through each step of the process so that you can be confident that your RV is properly winterized.
Steps To Winterize Your RV
If you’re like most RVers, you probably can’t wait to hit the open road and explore all the amazing places your rig can take you. But before you do, it’s important to make sure your RV is properly winterized.
Winterizing an RV isn’t difficult, but it does require taking a few extra steps to ensure everything stays in good working order. By taking the time to winterize your RV now, you’ll be able to enjoy worry-free camping all season long.
- Start by giving your RV a thorough cleaning, inside and out. This will help remove any dirt and grime that could cause problems later on.
- Next, you’ll want to make sure all the exterior seals are in good condition. These include the door seals, window seals, and any other areas where outside air can enter the RV.
- Once the exterior is taken care of, it’s time to move inside and do a little maintenance on the appliances. This includes things like emptying out the refrigerator and freezer, as well as running some vinegar through the coffee maker to clean it out.
- Finally, don’t forget to winterize your plumbing system. This involves adding antifreeze to all the drains and water lines in your RV.
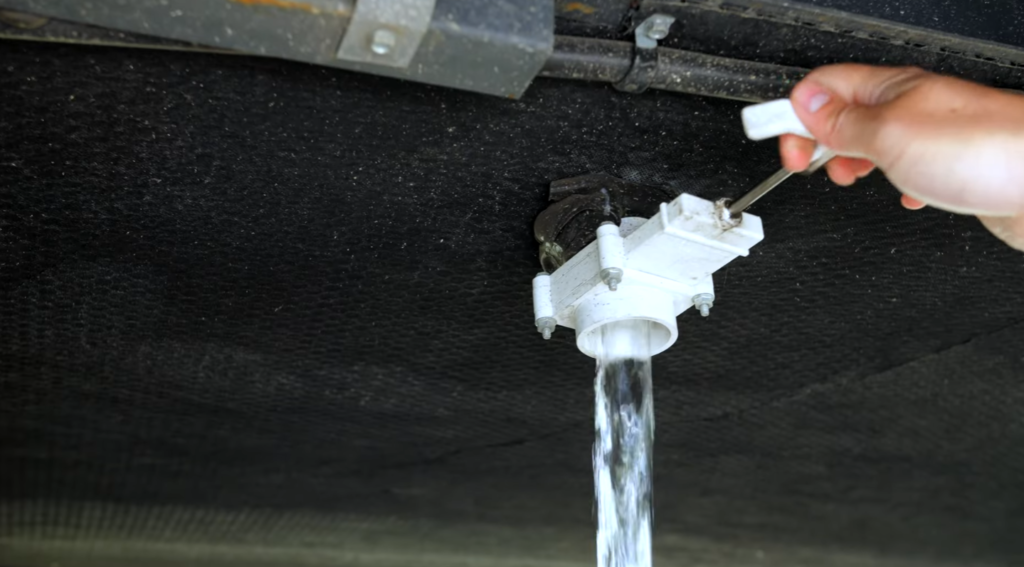
Drain and Flush the Black and Gray Water Tanks
The first step in winterizing your RV is to drain and flush the black and gray water tanks. This will help remove any build-up of waste that could cause problems later on.
To do this, simply open the valves for both tanks and let all the water drain out. Once the tanks are empty, you can then add a few gallons of clean water and let it run through the system to flush everything out.
Once you’re finished, be sure to close all the valves and give the tank a good cleaning with some soap and water. This will help prevent any odors from developing over the winter months.
If you have an RV with a septic system, it’s also important to have it pumped and inspected before winter.
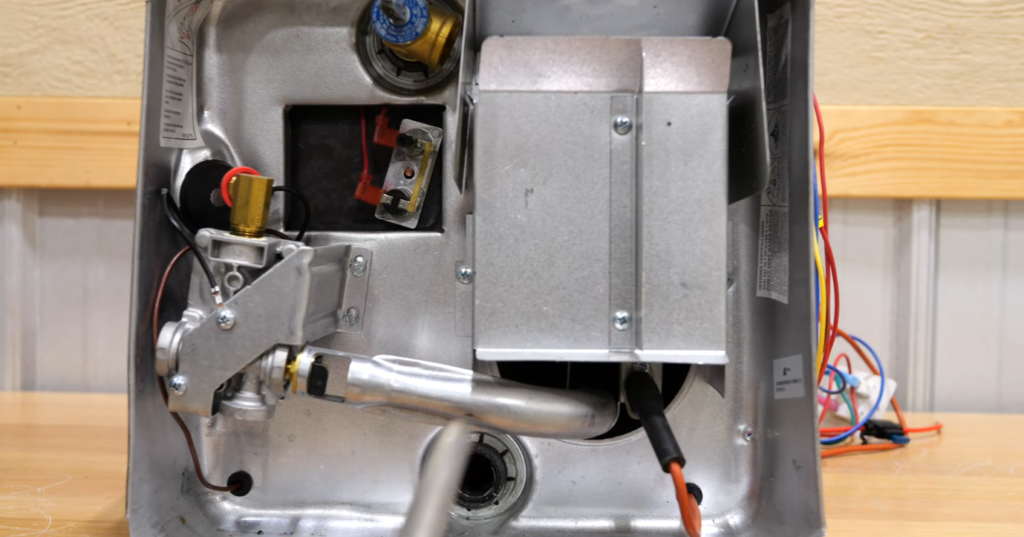
Drain and Flush the Water Heater
The next step in winterizing your RV is to drain and flush the water heater. This will help remove any sediment that has built up over time and could cause problems later on.
To do this, simply turn off the gas or electricity to the water heater and open all the valves. This will allow all the water to drain out of the tank. Once the tank is empty, you can then add a few gallons of clean water and let it run through the system to flush everything out.
Once you’re finished, be sure to close all the valves and give the tank a good cleaning with some soap and water. This will help prevent any odors from developing over the winter months.
If you have an electric water heater, you’ll also want to remove the elements and store them in a safe place. This will prevent them from freezing and cracking over the winter months.
Bypass the Water Heater
If your RV has a bypass valve for the water heater, great! If not, don’t worry, you can still winterize your RV. You’ll just need to do it a little differently.
To bypass the water heater, you’ll need to:
- find the cold and hot water inlets and outlets on your water heater.
- disconnect the inlet and outlet hoses from the water heater.
- connect the inlet hose to the outlet hose using a piece of garden hose or other similar tubing.
- make sure that any valves between the fresh water tank and the inlet side of the pump are open so that antifreeze can flow through the system.
If you have an RV with a gas water heater, you’ll also need to:
- open the pressure relief valve on the water heater to release any pressure that has built up inside.
- turn off the gas supply to the water heater.
- open all of the faucets in your RV to allow any remaining water in the lines to drain out.
Bypassing your water heater is a pretty simple process, but it’s important to make sure that you do it correctly so that you don’t damage your RV. If you’re not sure how to bypass your water heater, there are plenty of videos online that can show you how.
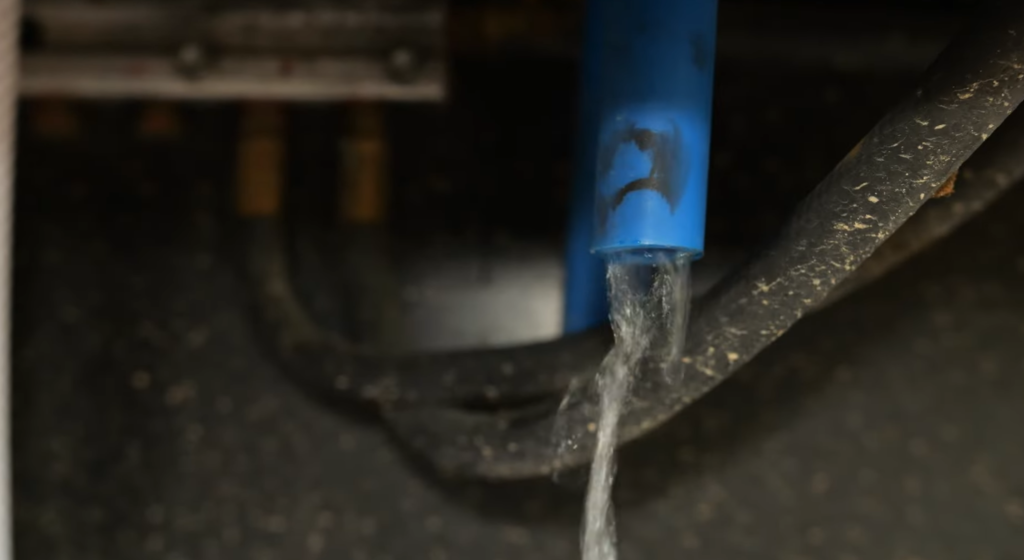
Drain the Fresh Tank and Low Point Drains
To winterize your RV, you’ll need to start by draining the fresh tank and low-point drains. To do this, you’ll need to locate the fresh water inlet on your RV (this is usually located near the water pump). Once you’ve found it, open the valve and allow all of the water to drain out. Next, locate the low point drains (these are usually located near the bottom of the RV) and open those valves as well. Let all the water run out until you only hear air coming from the faucet.
After you’ve drained both the fresh tank and low point drains, it’s time to move on to step five.
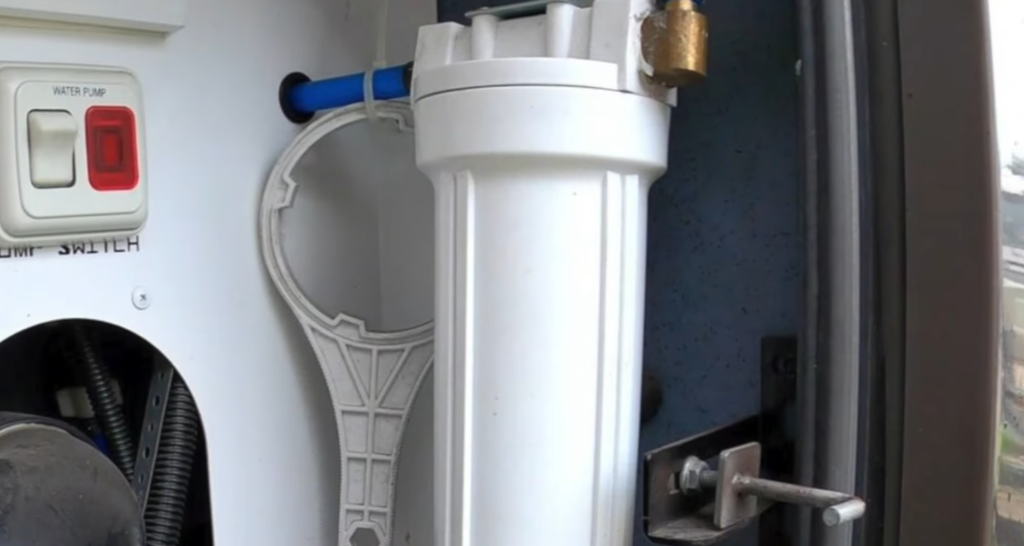
Locate the Water Pump
This is usually located under the sink, in a cabinet, or in a storage compartment. If you can’t find it, consult your owner’s manual. Once you’ve found it, turn off the power to avoid electrical shock. Then, using a wrench, remove the two hoses that connect the pump to the rest of the plumbing system.
You’ll need to do this so you can access the intake valve.
- Once you’ve found and turned off the power to the water pump, use a wrench to disconnect the two hoses that lead from the pump. Remove any screws or bolts holding the pump in place and set it aside. This will give you access to the intake valve.
- The intake valve is a small valve located near where the hoses were attached to the pump. It controls water flow into the pump and needs to be closed before winterization can begin.
- To close the intake valve, turn it clockwise until it’s snug against the housing. Once it’s closed, open all of your faucets and flush all toilets until no more water comes out. This will help remove any residual water from lines leading into your RV’s fresh water tank.
- Now that the intake valve is closed and all residual water has been flushed from the lines, it’s time to move on to the next step.
Open External Faucets and Valves on the Outside of the RV
The next step is to open all of the faucets and valves on the outside of your RV. This includes the water heater bypass valve, any exterior shower valves, and the city water connection (if you have one).
Once they’re all open, go back inside and turn on the pump. Let it run for a few seconds to remove any remaining water from the lines. Then, turn it off and disconnect the power again.
After you’ve turned off the pump, it’s time to move on to draining your RV’s fresh water tank.
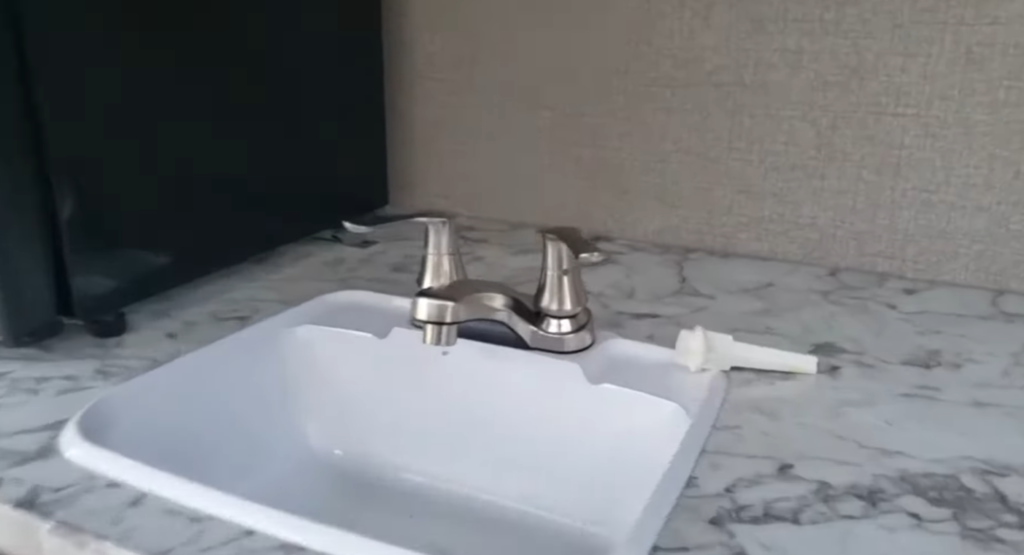
Open Internal Faucets, Showers, and Toilets
The next step is to open all of the faucets, showers, and toilets inside your RV. This will help remove any water left in the lines leading to them.
Once they’re all open, turn on the pump again and let it run for a few seconds. After that, turn off the power and unplug it.
Now that you’ve turned off the pump for the final time, it’s time to move on to adding antifreeze to your RV’s plumbing system.
Pour Antifreeze Down P-Traps
One last thing you’ll want to do before winterizing your RV is to pour antifreeze down all the P-traps. This will help keep them from freezing and cracking over the winter months.
To do this, simply remove the plug from each P-trap and pour in a generous amount of antifreeze. You can then replace the plugs and run some water through the drains to make sure they’re clear. [3]
Quick tips to prep your RV for winter storage
If you’re like most people, you probably don’t use your RV during the winter months. But just because you’re not using it doesn’t mean you can just leave it to fend for itself!
Here are a few quick tips to help you get started:
- Start by giving your RV a good cleaning, inside and out. This will help remove any dirt, dust or debris that could cause problems later on.
- Next, check all of your hoses and seals for leaks. If you find any, make sure to repair them before storing your RV.
- Once everything is nice and clean, it’s time to add some protection against the elements. Use a RV cover to keep your RV safe from snow, ice and wind damage.
- Finally, make sure your RV is properly ventilated to avoid any musty odors or condensation buildup.
By following these simple tips, you can help ensure that your RV will be ready to hit the road when spring rolls around!
FAQ
Do you put RV antifreeze in the freshwater tank?
You don’t need to put RV antifreeze in the freshwater tank, but you may want to if you’re planning on leaving your RV unused for an extended period of time. Adding a bit of antifreeze will help prevent your water lines from freezing and bursting.
To add RV antifreeze to your freshwater tank, simply pour it in through the fill spout until you reach the desired amount. Keep in mind that you’ll need to use more antifreeze if your RV has a larger freshwater tank.
Once you’ve added the desired amount of antifreeze, run all the faucets in your RV until you can smell the antifreeze coming out of them. This will help ensure that all the water lines in your RV are protected from freezing.
Finally, be sure to empty and flush your RV’s black and gray water tanks before winterizing them. This will help prevent any sewage from freezing and causing problems later on. [4]
Once you’ve taken care of all of these things, your RV should be properly winterized and ready for storage!
How do I winterize my RV with antifreeze?
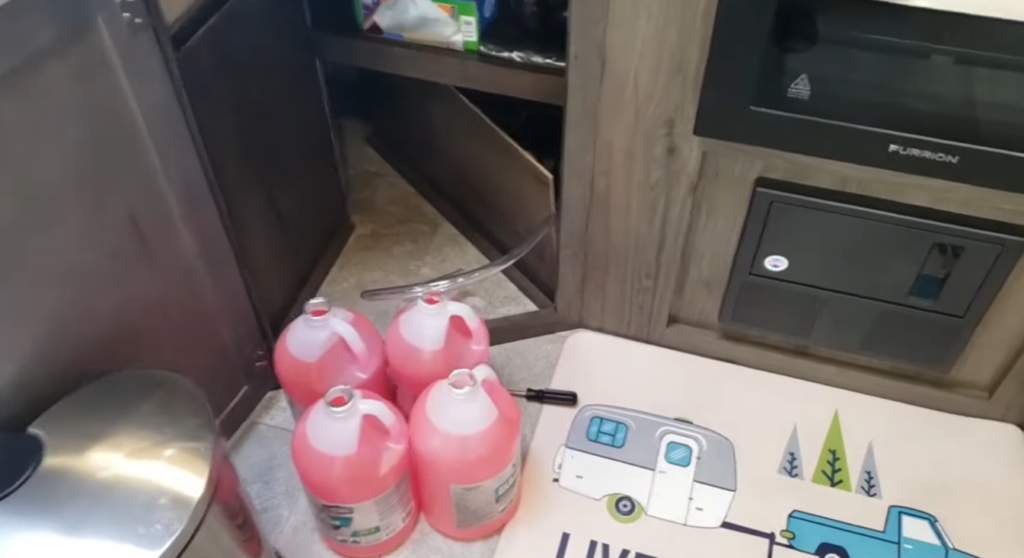
The most important part of winterizing your RV is to use antifreeze. Antifreeze will keep your pipes from freezing and bursting during the cold winter months. You can buy RV antifreeze at most hardware stores or online. Be sure to follow the directions on the package for how much to use.
To winterize your RV with antifreeze, you’ll need to do the following:
- Drain all the water out of your fresh water tank and add RV antifreeze.
- Flush your toilets several times and add a quart of RV antifreeze to each one.
- Pour RV antifreeze into your drains, including your shower and sink.
- Disconnect your water heater and add RV antifreeze to it.
- Add RV antifreeze to any other places where water might be, such as your washing machine or ice maker. [5]
How much antifreeze Do I need to winterize my RV?
This is a common question that people ask when they are getting ready to winterize their RV. The answer depends on the size of your RV and how much water you have in it. Generally, you will need between two and four gallons of antifreeze for a small RV and between four and six gallons for a large RV. [6]
If you are unsure about how much antifreeze to use, it is always better to err on the side of using too much rather than too little. This way, you can be sure that all of the water in your RV is protected from freezing.
Should I put antifreeze in my RV water heater?
Most RVers will tell you that you don’t need to put antifreeze in your water heater. However, if you live in an area where the temperatures dip below freezing, it’s a good idea to add a cup or two of non-toxic RV antifreeze to your water heater. This will help prevent your water lines from freezing and bursting. [7]
If you decide to put antifreeze in your water heater, be sure to follow the manufacturer’s instructions on how much antifreeze to use. You don’t want to overdo it and end up damaging your RV!
Can you winterize your RV when it’s below freezing?
Yes, you can winterize your RV when it’s below freezing. However, you’ll need to take some extra precautions to ensure that your pipes don’t freeze and burst. Here are a few tips:
- Insulate any exposed pipes with foam insulation or pipe sleeves.
- If possible, park your RV in a garage or carport to keep it out of the elements.
- If you’re going to be gone for an extended period of time, consider turning off the water supply to your RV. This will prevent any water from getting into the system and freezing.
- Drain all of the water out of your fresh water tank and then add antifreeze to the tank. This will prevent the tank from freezing and bursting.
Useful Video: How to Winterize a Camper | Easy Winterizing in Less Than 10 Minutes
Conclusion
In conclusion, winterizing your RV is a necessary step to take in order to protect your investment. By following the tips and advice outlined in this article, you can be sure that your RV will be ready for whatever winter throws its way. So, don’t wait until the last minute to winterize your RV – start planning now and enjoy a worry-free season! Thanks for reading!
References
- https://rvblogger.com/blog/do-you-have-to-winterize-an-rv-or-camper/
- https://carefreecoveredrvstorage.com/blog/its-time-to-winterize-8-steps-to-safely-store-your-rv
- https://blog.campingworld.com/rv-basics/how-to-winterize-your-rv/
- https://recvehicle.com/winterization-and-rv-antifreeze/
- https://koa.com/blog/rv101-7-easy-steps-to-winterizing-your-rv-plumbing-system/
- https://www.reserveamerica.com/outdoors/how-to-winterize-an-rv.htm
- https://crowsurvival.com/can-you-put-rv-antifreeze-in-hot-water-heater/