RV toilet removal is the most important thing to know when you are looking at RV toilets. If you have a particularly old model, it may be worth your time and effort to replace the whole unit with a newer tankless version rather than spending hours trying to fix up an older one. In addition, you might be interested in how to heat an RV without propane and how to remove RV light covers and replace bulbs. For those of us who don’t want to spend the money on a new RV toilet, this post will show you how to remove an RV toilet in no time!
Table of Contents
How to Remove an RV Toilet?
Empty the Waste Tank
- Disconnect the sewer hose from the dump station;
- Remove all water in holding tanks by draining them through your freshwater tank valves. Some models have both gray and black tanks that are emptied separately while some just have one large tank for everything;
- To drain greywater, turn off the valve located near your kitchen sink if there is one installed or open up a faucet until it runs clear of debris;
- Close this line back up after removing any remaining waste in it with either a plunger or auger snake depending on what type of system you have set up inside your RV walls for drainage purposes (even RVs can be plumbed);
Do not use chemicals because they will hurt the environment and could damage your septic system.
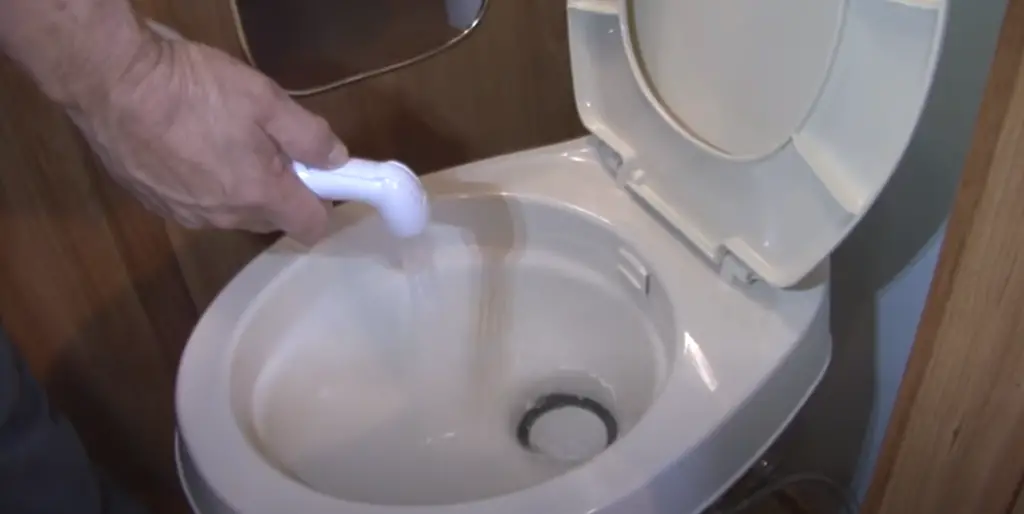
Prepare the Toilet
- To remove the toilet, you first have to take out all of its internal parts. This includes anything that can come loose such as a hose or seal so it is best to lay everything on a towel and take pictures for reference later;
- Empty any water left inside by flushing until it runs clean from both sides of the bowl into your sewer hose leading outside. Then wipe down the surface with paper towels or rags before putting in new rubber rings where necessary to ensure no leaks occur once reassembled properly;
- Once done taking apart every part possible, put them back together without forgetting which goes where! Make sure there are no problems like rusting screws because if they snap off when reinstalling then bad things will happen like having to pay someone else for professional help;
Unscrew the Bolts
- Find the screws holding your toilet in place on both its flange and tank. Then lift up gently while pulling toward you slowly to remove it from where it sits since most RV toilets use bolts instead of being attached by adhesives which is usually more common with residential models;
- Most RVs have two sets of bolts attached to the floor near its drain plug and at least one set on top used for holding down both the tank and flange;
- Remove these ones before unscrewing anything else either with your hands or with power tools if they are too tight depending on their condition after years of use requiring more elbow grease than others. Because some people do not tighten them correctly, rather just enough where there is still play in order to line up properly once seated back onto it during reassembly;
- There should be a rubber gasket between the toilet and floor that you can push down on with your fingers to remove it before you pull up slowly while holding onto its base until everything is released without breaking any parts. If this does not work then consider using long screwdrivers or other tools required for removing smaller pieces of hardware;
If you need help removing hardware then consider using a professional who specializes in plumbing repairs even though it will be money spent regardless since this could save time doing things yourself which can lead to mistakes causing much bigger problems than when originally found so take your time doing things correctly!
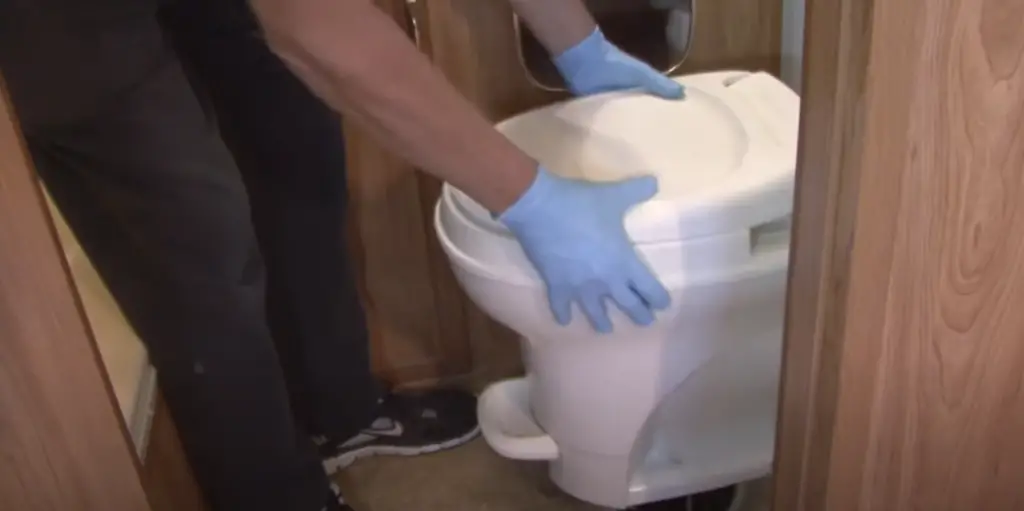
Remove the Toilet
- Once everything has been removed from the bolts, turn off your water again and drain it from every hole possible;
- Remove all of the screws from any extra pieces that do not come loose by hands such as seats or lids so you can clean inside properly without damaging anything else in your septic system;
- Pick a good spot to lay everything out on towels for easy access once putting them back together during reassembly;
- Do not forget which parts go where based on how many times they have been taken apart because doing something incorrectly could cause leaks later when least expected leading to more expensive problems down the line requiring even more money spent just trying to repair what was already working before this point. If done correctly then there should be no further issues with installing new rubber gaskets and anti-siphon valves if needed since everything will already be clean inside;
Benefits of RV toilets
Convenience
They are extremely convenient and easy to use. You don’t need a sewer hookup or any other such connections for it to work. There’s no special waste treatment process that needs to be done either; you just dump the contents in someplace where they can dry out, like at your campsite or on public land (with proper disposal of course).
They come with tankless water heaters (usually propane), which means you get hot water whenever you want without worrying about heating up too much extra gas if only one person is using them. Just push a button and there’s running water instantaneously!
No more fiddling with little knobs until just enough warmish/coolish dribbles from the shower nozzle – what a time saver! They even have a regular little sink area for brushing teeth and washing your face.
Comfort and privacy
Many RVs have a full-sized bathroom with a nice big shower and regular toilet. Some even come in luxury models, which feature a separate room for each one of them! Little things like having your own private facilities where you can be by yourself to take care of business or relax after a long day traveling are very important when away from home – not only that but they also provide an air of privacy and comfort when used at other people’s houses while visiting relatives.
Safety
Many RV toilets actually prevent backups into their holding tanks through technological advances such as pressure-assisted flushing systems. This means no more smelly messes from sewage backup problems during unexpected road trips (the most awful thing ever).
Versatility
They’re not just for RVs. Many people like to use them as a cheap alternative to installing expensive and space-consuming septic systems in their homes (especially those who live on lots of lands or have large acreage). They can also be used with other types of vehicles such as boats, campers, and trucks.
Eco-friendly
RV toilets are a great alternative to conventional flush loos because they use less water. In fact, most of them can be configured with different types and amounts of chemicals depending on the user’s preference. Some people even make their own from recycled household items!
Types of RV toilets
Traditional Gravity Toilet
This type is most common and standard in many trailers. It uses gravity to dump the waste from your holding tank into an open drain field or septic system when the sewer hose is connected outside.
Macerating Flush
This type is a high-pressure water flushing system that macerates the waste, releasing it from its holding tank. The result is treated and emptied into a drain field or septic system.
Composting Toilets
This type is considered by many to be the best way to go for cleanliness and being environmentally friendly. This toilet does not use any flushing water, instead, it uses air to dry out waste material which gets “composted” into a soil-like material that can be disposed of in your garden or flowerbeds.
FAQ
How do you remove an old RV toilet?
You must first remove the water from the toilet tank by either using a wet/dry vacuum or letting it sit without any water in it for several days. Then, you can proceed with removing the bolts holding the bowl to the floor of your RV’s bathroom and lifting up on one side so that they pop out of their holes.
Next, you will need to break off all remaining wax seal material around the opening of where the old toilet was sitting below and then clean everything thoroughly before putting your new toilet into place!
Finally, just go ahead and install your new unit according to the manufacturer’s instructions – making sure not to over-tighten anything – and refill its water tank as well as plugging it back in if necessary!
How do you remove a Thetford toilet from an RV?
Once you’ve determined which model of Thetford toilet you have, it’s time to remove the bolts that attach it to your flooring. These bolts will probably be under a plastic or metal cap so they may require some extra effort and patience in order to get them off without breaking anything.
Once all the bolts are removed from underneath these caps, lift up slightly with one hand while using your other hand as leverage by pushing down at an angle through the bolt holes – but don’t pull too hard because this could cause problems with how well things fit back together later!
Can you replace an RV toilet with a regular toilet?
Yes, it is possible. First, you need to remove the old toilet and replace it with a new one. The steps to do so are simple:
- You need to flush the old toilet and turn off the water supply valve behind it;
- Remove the bolts holding the tank in place with a screwdriver or wrench;
- Disconnect any hoses attached to the bottom of the tank using your hands or pliers if necessary;
- Lift out both pieces carefully and set them aside before placing new ones into position on top of the floor flange;
What is the tallest RV toilet?
RV toilets come in different sizes. When you are replacing a toilet, consider the measurements of the space as well as the current height to determine what size will work best for your camper or RV. In general, most standard-height toilets measure between 14 and 16 inches tall from the seat base to the cover lid. You can find taller models that range from 18 to 20 inches at their tallest point depending on manufacturer specifications.
Do RV toilets have wax rings?
Yes. They have wax rings that are similar to the ones in your house, but they’re smaller and thinner.
Sometimes there is no wax ring with an RV toilet, and you will need to use a rubber gasket instead. The bolts are tightened directly onto the bottom of the flange so it makes for easy removal when necessary.
What does a vacuum breaker do on an RV toilet?
A vacuum breaker is a device that prevents water from siphoning out of the toilet’s holding tank.
Can you put a bidet on an RV toilet?
No, you can’t. A standard RV toilet is not designed to work with a bidet. This would involve making some major modifications to the plumbing and electrical system of your RV, which could increase both safety risks as well as costs considerably.
Why is my RV toilet leaking?
A malfunctioning flapper valve is the most common cause of a leaky RV toilet. Check under your RV and see if it has leaked to the ground. If so, you likely have a broken or damaged flapper valve that needs replacement.
Here is what you should remember:
- If your water is clean and it’s not leaking onto the ground, then you probably have a stopped-up toilet;
- Try using a plunger to unstop the clog. You can also use an auger if that doesn’t work;
- The wax ring under your RV toilet may be old or dried out, causing leaks;
- Check for signs of cracking around where the base meets the flooring in order to find out if this is causing problems with your RV toilet flapper valve seal;
- Your tank might need maintenance too, which could lead to broken seals on parts like ball valves or fill valves. This will cause water leakage into your bathroom when trying to flush;
Are all RV toilets the same size?
RV toilets come in different sizes. They range from a standard height of 16 to 21 inches.
The width is about 14-15 inches for the most part and they are usually around 22 inches deep, but it can vary depending on brand and model.
What is the weight limit for an RV toilet?
A typical RV toilet has a weight limit of 250 lbs. Some models can hold up to 340 pounds.
Should an RV toilet hold water?
Typically, your RV toilet will retain a little water in the bowl after it has been flushed. It is less than your home toilet, but enough to keep odors from rising from the black water tank and entering your RV’s cabin.